Notice: NotaryCafe has no affiliation with US Directory and we will never ask for credit card information over the phone. If contacted by someone who implies otherwise, it is a scam. Please reach out to us via our contact form if you have additional questions or visit our forum threads on their business practices. NotaryCafe Forum.

Got Questions?

We're here to help. Send us a message and we will get right back to you.

General Question?
Support Question?

Notary Search FAQ’s:

Q:
How does the notary search work?
A:

The notary search page was designed to accommodate those searching for notaries with an easy to use single search field in addition to advanced filters to narrow your intended search.

In the single search field you can enter a zip code, city, state, county, full address, or email and our search engine will provide you results based on the entered criteria. To further narrow your search results you can utilize the advanced filters to target notaries within those specific criteria in their profile.

Q:
How are agents displayed in the search results?
A:

Zip code & city searches are measured based on map radius to the agent's zip code. Preference goes to zip codes that are primary, then secondary, and so forth. A tiebreaker will be based on when the agent profile was last updated.

Q:
What does ‘No Profile Data Available’ mean when I view an agents profile?
A:

The agent has the ability to hide specific information from public view in their profile to protect their privacy. Certain information such as their work phone and work email are required for public view so you will always have a way to contact the agent. In addition, our network of signing services will always be able to see the non public information.

Q:
Can I view an agent’s background screen in their profile?
A:

If an agent has linked their documents to their profile and allowed them to be viewable in the public listing you will be able to select the link to the document under the Document Links section of the profile.

Q:
Do you have advanced filters?
A:

Absolutely. Below the single search field expand the advanced search filter tab and enter in criteria such as Company Name, background Check provider name, or checkmark individual capabilities and then search again.

Q:
How does the map feature work?
A:

First expand the map feature with the orange expansion tab. Once expanded you will see agents placed on the map with markers. Select a marker to see the agents name and photo. If you select their name from the popup on the marker you will be taken to their profiles expanded summary view. If the agent has chosen to keep their address out of public view in their profile their marker will appear at the center of their primary zip code.

Agent Profile FAQ’s:

Q:
How can I hide specific profile information from the public view?
A:

Within each section of your profile there is a globe icon    in the header of the section or under the Visibility header within each row of the section, depending on what information you are trying to change.

If the globe icon is grey you are not able to hide this information from public view. If the globe is dark blue simply select the globe icon to enable the feature. Doing so will change the icon to a    indicating that this information is not available to the public when viewing your profile.

Q:
How do I update my profile information?
A:

Once logged in, navigate to the “Profile Settings” menu item. Once your profile loads select the Edit All button in the upper right of your profile to edit the entire profile. Or you may select the Edit icon within the specific section of your profile you need to update if you only need to make changes to that section. Select the Save button once your changes are complete.

Q:
How do I add my photo to my profile?
A:

In the upper left of the profile select the Add/Edit button below the blank photos. An image uploader will appear on the page allowing you to browse for your image. Once selected, click “Done Adding/ Removing Files”. Use the cropping tool to position your photo so it sits in the selection the way you would like it to appear in your profile. Select the “Crop/Save” button to save your changes. You can add three photo’s to your profile that can be toggled through by anyone viewing your profile.

Q:
How do I add my professional and social links to my profile? Pro Member Feature
A:

Once logged in, navigate to the “Profile Settings” menu item. Once your profile loads select the Edit All button in the upper right of your profile. Click on the box adjacent to the social media icon you would like add your link to and enter your personal link. Repeat for each link you want to update. Select “save” at the right when you are done.

Q:
How do I add my profile to the Public Listing? Pro Member Feature
A:

Once logged in navigate to the “Profile Settings” menu item. Once your profile loads select the Edit All button in the upper right. At the top of your profile select “Yes” next to the “In Public Search” icon, then the “Save” button in the upper right.

Q:
How do I add additional zip codes to my profile? Pro Member Feature
A:

Once logged in navigate to the “Profile Settings” menu item. Once your profile loads select the Edit All button in the upper right. At the top of your profile, add up to four additional zip codes then select the “Save" button in the upper right.

Q:
How do I get to the top of the search results?
A:

First, make sure you are a Pro member. Free members will only show up on searches within our network of signing services.
Second, make sure you have selected “Yes” next to the “In Public Search” option on your profile page.

Zip code & city searches are measured based on map radius to the agent's zip code. Preference goes to zip codes that are primary, then secondary, and so forth. A tiebreaker will be based on when your profile was last updated, so there's an advantage to keeping your profile current.

For searches that don't use a map radius (eg. by Name or State), results are simply alphabetical.

Q:
How do I upgrade to a pro membership or extend my membership?
A:

Once logged in navigate to the “Account Settings” menu item. Select “Membership Payment” on the right side of the page and enter your payment credentials. Select “Save” at the bottom when you are ready to proceed. (Click here to see the benefits)

Q:
Can I link my profile to my website or other accounts? Pro Member Feature
A:

Yes, in the membership section of your profile you will find a short link that you can copy and paste for others to be able to view your profile.

Q:
How much does it cost to become a Pro member?
A:

Pro Memberships are available on a monthly or an annual basis. If you wish to pay monthly it is a low $5 per month. For additional savings select the Yearly membership and save 40% off our monthly Pro membership. (Click here to see the benefits)

Q:
What is the difference between the Introduction and Experience and Personal Bio in my profile?
A:

The Introduction and Experience section was designed for you to market yourself with your business experience and qualifications. The Personal Bio is an extension of this where you can also enter in additional personal information about yourself so those looking for notaries can learn a little more about you as a person when determining who they would like to contact.

Q:
How does the Send an Email or Send an SMS work in my profile?
A:

When someone looking for an agent would like to contact them they have the option of Emailing or Texting you in lieu of contacting you with a phone call. Our system handles the outgoing message and delivers it to your work email or work phone unless you have a different phone or email marked as preferred in which case we will send the email or text to what you have as preferred in the profile.

Box.com document sharing:
step-by-step instructions.

  • Create a new account, or login to your existing one at https://www.box.com/.
    1. Click on the upload button
    2. Click “upload files.”
    3. Select the appropriate documents.
    4. Select “add more files,” to choose more documents to upload, or click “upload”.
  • If sharing multiple documents, it may be better create a folder in Box and place them all there, so you can link to the folder from your profile.
    1. Click the “New” icon and select “New Folder”
    2. Enter a name for the folder, select “Keep Private For Now” and click “Okay”
  • To move documents into the new folder:
    1. Click the “More Options” drop down button on the file you want to move.
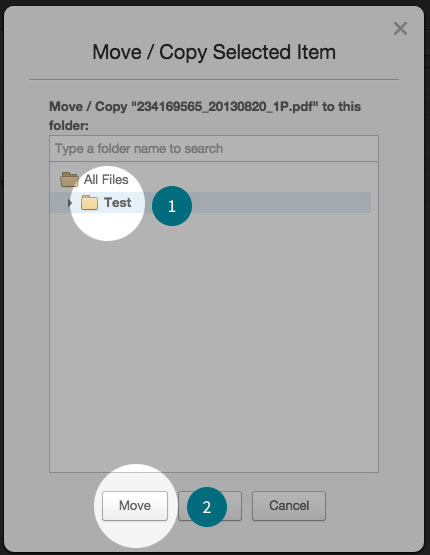
    2. Click “move or copy”
    3. Select the folder (1) you want to move the document to, and then click “Move” (2)
  • To share your documents:
    1. Login to your account at www.box.com
    2. Navigate to the document you want to share.
    3. Click on the share button on the right of the document details (it will turn blue when your mouse hovers over the file)

      • This opens a dialog box where you can copy the link to the file
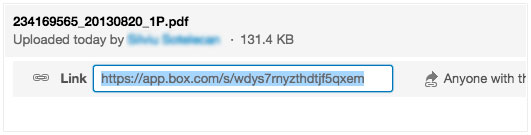
      • Hit “CTRL” + “C” on your keyboard (CMD + C for Mac), or right-click and select “Copy” to copy the link.
    4. Paste the link into your profile at www.NotaryCafe.com.
      • Login to you profile at www.NotaryCafe.com, and click “edit” on the “Document Links” section.
      • Paste the link you copied into the URL box (3) The link will always start with https://app.box.com.
      • Select the document type (1)
      • Name your document (2)
    5. Make sure you click “save” on your www.NotaryCafe.com profile.

Dropbox document sharing:
step-by-step instructions.

  • Sign in to the Dropbox website.
  • Go to your list of files and folders and select the folder you want to share by clicking on the empty space to the right of the folder's name. (Clicking on the folder name or icon will open the folder instead.)
  • If the folder is currently unshared, click Invite to folder in the toolbar:
    Click Invite to folder to share a folder the first time
  • If the folder is already being shared, click Shared folder options:
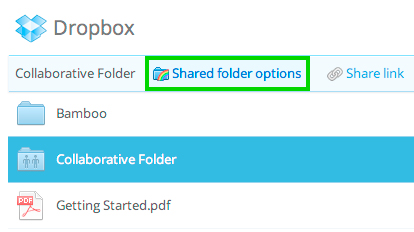
    Click Shared folder options to invite more people
  • Enter the email addresses of the people you want to invite.
  • Add a personal message if you'd like and click Share folder.

You can also invite people to folders from the Sharing page. To create a new shared folder, click the New shared folder button at the top of the page. To invite more people to an existing shared folder, find it in the list and click its Options link.

Google Drive document sharing:
step-by-step instructions.

  • Go to drive.google.com
  • Check the box next to the file or folder you'd like to share.
  • Click the Share icon.
  • Choose a visibility option: "Private," "Anyone with the link" or "Public on the web."
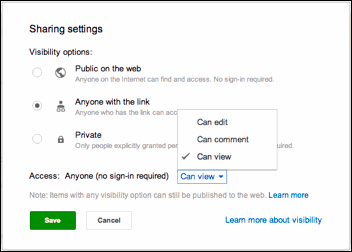
  • Type the email addresses of the people you want to share with in the text box below "Add people." You can add a single person or a mailing list.
  • Choose the access level from the drop-down menu next to each collaborator: "Can view," "Can comment," or "Can edit."
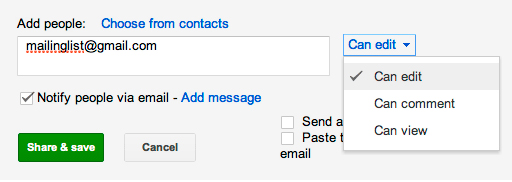
  • Click Share & save.

Sharing something with a mailing list? If you’re sharing with a group containing more than 200 members, either notify the group by email or provide a link to the file. Your fellow mailing list members need to directly click the link, in the email notification or otherwise, for the file to show up in their Drive lists. The file will show up in the "Recent" and "All items" section of Drive for group members.